Animation tutorial
Please download all examples before you start. In this tutorial I will give you some ideas on how to approach some things, but I will not give you complete solutions. Normally you will have to code your own solution anyway. Have fun.Simple animation
So what is an animation exactly? As you might know, it is simply a sequence of images which are displayed so fast that the eye can not see the gap between the different images anymore. Because of this the animation looks smooth.So it sounds easy to code, right? Just a short summery of what you have to do to get an animation:
- Load the images into a list (using pygame.image.load() ).
- During each update change the current image to the next one.
- If the counter reaches the end of list reset it to the beginning
- Do it fast enough in order to let it look smoothly.
 In code it is something like this:
import pygame
import pygame.sprite.Sprite as Sprite

class SimpleAnimation(Sprite):

    def __init__(self, frames):
        Sprite.__init__(self)
        self.frames = frames       # save the images in here
        self.current = 0       # idx of current image of the animation
        self.image = frames[0]  # just to prevent some errors
        self.rect = self.image.get_rect()    # same here
        self.playing = 0

    def update(self, *args):
        if self.playing:    # only update the animation if it is playing
            self.current += 1
            if self.current == len(self.frames):
                self.current = 0
            self.image = self.frames[self.current]
            # only needed if size changes within the animation
            self.rect = self.image.get_rect(center=self.rect.center)
To be able to do this we need to store some information. As you can see the frames are stored in a
list. Furthermore we need to know which image is the current image, therefor we save the index saved in
'current'. Naturally you will have to load and put the frames into the list before you call
update() the first time. The attribute 'self.playing' could be changed through the functions
'start()', 'stop()' or 'pause()' and 'resume()'. I did not put them here because they are
very simple (the basic idea is to play around with self.current).
This is the simplest, frame-based and endless looping animation you can have. It has the disadvantage of running with the fps of your game.
As for any tutorial here, I would appreciate any comments, ideas, suggestions or any feedback. Thanks.
top | back to tutorials overviewHow to change a frame
In this section I will discuss some ways of changing the current frame of the animation. I have already showed it to you for simple frame based animations:
self.current += 1
if self.current = len(self.frames):
    self.current = 0
There are other ways to achieve exactly the same. One is simply a little bit different approach:
self.current += 1
if self.current = len(self.frames):
    self.current -= len(self.frames)
Or you could use modulo math:
self.current += 1
self.current %= len(self.frames)
In any case you need to know how many frames your animation has and I would recommend storing it so you do not have to use len() every time since you want to make the code somewhat efficient.
The last two approaches are also good if you want to introduce frame skipping later, which can occur if you use an time based approach. But I will discuss this later.
As for any tutorial here, I would appreciate any comments, ideas, suggestions or any feedback. Thanks.
top | back to tutorials overviewKinds of animations
Well, here I would like to present to you different sequences and how to implement them:- looping
- forward
- reverse
- pingpong
The hard way is changing the code of the animation. This would make the index manipulation more complex and thus more room for bugs. Since any of these sequences can be achieved in a simple way without changing the code I would suggest to forget about the idea of changing the code.

The easy way is actually very simple. The only thing you have to do is to change the order of the frames in your animation. So for a forward animation you might have this order: [1,2,3,4,5] for a 5 frame long animation. To make a reverse of that you simply have to change this to: [5,4,3,2,1]. And the pingpong animation is not more complicated: [1,2,3,4,5,4,3,2] or [1,2,3,4,5,5,4,3,2,1]. Using this technique you can make any sequence you want with the frames. The only thing you have to pay attention to is do not load an image twice.
frames = []
for i in range(5):
    frames.append(pygame.image.load("pic"+str(i)+".png"))
for i in range(4, -1, -1):
    frames.append(pygame.image.load("pic"+str(i)+".png")) # wrong!!
# gives [0,1,2,3,4,4',3',2',1',0'] but WRONG because frames have been loaded twice!!

#better
frames = []
for i in range(5):
    frames.append(pygame.image.load("pic"+str(i)+".png"))
for i in range(5):
    frames.append(frames[4-i]) # right, using same object twice
# this gives [0,1,2,3,4,4,3,2,1,0]
Instead of writing custom code you can wrap this functionality into functions:
As you can see, the only thing you need to get different kinds of sequences are loading functions or
perhaps even better, functions which constructs another sequence from the normal standard case
[0,1,2,3,4,...].
cache = {} # has to be global (or a class variable)
def get_sequence(frames_names, sequence, optimize=True):
    frames = []
    global cache
    for name in frames_names:
        if not cache.has_key(name): # check if it has benn loaded already
            image = pygame.image.load(name) # not optimized
            if optimize:
                if image.get_alpha() is not None:
                    image = image.convert_alpha()
                else:
                    image = image.convert()
            cache[name] = image

        # constructs a sequence of frames equal to frames_names
        frames.append(cache[name])
    frames2 = []
    for idx in sequence:
        # constructing the animation sequence according to sequence
        frames2.append(frames[idx])
    return frames2

def get_names_list(basename, ext, num, num_digits=1, offset=0):
    names = []
    # format string basename+zero_padded_number+.+ext
    format = "%s%0"+str(num_digits)+"d.%s"
    for i in range(offset, num+1):
        names.append(format % (basename, i,ext))
    return names

image_names = get_names_list("pic", "png", 4)  # ["pic0.png","pic1.png","pic2.png","pic3.png"]
sequence = [0,1,2,3,2,1]
frames = get_sequence(image_names, sequence) # [0,1,2,3,2,1]
Notes: Loading should be done by a resource manager if
available (it is better than nothing). You might want to use other filename formats. The indices
in the sequence list must not exceed the number of frames in image_names.
As for any tutorial here, I would appreciate any comments, ideas, suggestions or any feedback. Thanks.
top | back to tutorials overviewTime based
Until now we have changed our frame on each call to update. It has the disadvantage that if your application runs fast on one computer and slow on another one, then the animation will look different on these computers (it will run faster on the fast one). And that is not good. What we want is an animation which looks the same on each computer. How can we achieve this? Use some timing! And if you want to make a slow motion effect? Easy: just manipulate the time you pass in! Let me show it in a picture:
Marked with green is when your animation has to be updated (every 50ms, this is a 20 fps animation). The red marks show you how long it took to pass once through the main loop (call it dt, delta time). As you can see this time (dt) varies each pass through the main loop. So now you see what I was talking about (if you would have frame based animation then on each red mark the image of the animation would have changed). The black numbers represent the current time. The simplest approach leads to following code:
import os
from pygame.sprite import Sprite


class TimedAnimation(Sprite):

    def __init__(self, frames, pos, fps=20):
        Sprite.__init__(self)
        self.frames = frames     # store frames in a list
        self.image = frames[0]
        self.rect = self.image.get_rect(topleft=pos)
        self.current = 0         # current image of the animation
        self.playing = 0         # to know if it is playing
        self._next_update = 0    # next time it has to be updated in ms
        self._inv_period = fps/1000. # 1./period of the animation in ms
        self._start_time = 0     # has to be set when the animation is started
        self._paused_time = 0
        self_pause_start = 0
        self._frames_len = len(self.frames)

    def update(self, dt, t):
        # dt: time that has passed in last pass through main loop,  t: current time
        if self.playing:
            # period is duration of one frame, so dividing the time the animation
            # is running by the period of one frame on gets the number of frames
            self.current = int((t-self._start_time-self._paused_time)*self._inv_period)
            self.current %= self._frames_len
            # update image
            self.image = self.frames[self.current]
            # only needed if size changes between frames
            self.rect = self.image.get_rect(center=self.rect.center)
The code should be more or less self explanatory. My question now is: Can we make it more efficient?
Why go through all these calculations, even if the animation stays in the same frame?
Let's try it:
class TimedAnimation2(Sprite):

    def __init__(self, frames, pos, fps=20):
        Sprite.__init__(self)
        self.frames = frames     # store frames in a list
        self.image = frames[0]
        self.rect = self.image.get_rect(topleft=pos)
        self.current = 0         # current image of the animation
        self.playing = 0         # to know if it is playing
        self._next_update = 0    # next time it has to be updated in ms
        self._period = 1000./fps # frequency/period of the animation in ms

    def update(self, dt, t):
        if self.playing:
            # accumulate time since last update
            self._next_update += dt
            # if more time has passed as a period, then we need to update
            if self._next_update >= self._period:
                # skipping frames if too much time has passed
                # since _next_update is bigger than period this is at least 1
                self.current += int(self._next_update/self._period)
                # time that already has passed since last update
                self._next_update %= self._period
                # known code
                self.current %= len(self.frames)
                # update image
                self.image = self.frames[self.current]
                # only needed if size changes between frames
                self.rect = self.image.get_rect(center=self.rect.center)
This should be much better, since the "big work" is only done when really needed.
But it still needs to accumulate the time passed. If you contemplate about it, you actually
can get rid of it too:
class TimedAnimation3(Sprite):

    def __init__(self, frames, pos, fps=20):
        Sprite.__init__(self)
        self.frames = frames     # store frames in a list
        self.image = frames[0]
        self.rect = self.image.get_rect(topleft=pos)
        self.current = 0         # current image of the animation
        self.playing = 0         # to know if it is playing
        self._next_update = 0    # next time it has to be updated in ms
        self._period = 1000./fps # period of the animation in ms
        self._inv_period = 1./self._period
        self._paused_time = 0
        self._pause_start = 0
        self._frames_len = len(self.frames)

    def update(self, dt, t):
        if self.playing:
            # do only something if the time has come
            if self._next_update <= t:
                # time past since it should have updated
                delta = t - self._paused_time - self._next_update
                # calculate if there are any skipped frames
                skipped_frames = int(delta*self._inv_period)
                # next time to update
                self._next_update = self._next_update + self._period + skipped_frames * self._period
                # update to next image
                self.current += (1+skipped_frames)
                # bind it to the length of the animation
                self.current %= self._frames_len
                # update image
                self.image = self.frames[self.current]
                # only needed if size changes between frames
                self.rect = self.image.get_rect(center=self.rect.center)
Actually, after some profiling I found that the first approach, the simplest one is the
fastest. I think it is caused by the small number of instructions when it really updates. The
other two approaches need to calculate much more. But since the difference is small (~5ms max)
it does not matter which one you choose to use. I would choose the simplest one to use.
About frame skipping: it occurs when the frame rate of the main loop is slower than the one from the animation. It should not happen, but it can. If you are sure that you will never experience frame skipping then you can remove the code (actually it is the same as when skipped_frames is 0, which it should be most of the time).
Another thing I want to mention is that instead of passing in the real time, perhaps it would be better to pass in a game time. When doing so then you can manipulate the game time to make some effects like slow motion, fast motion and implementing a pause will cause no trouble (just stop the game time from advancing).
As for any tutorial here, I would appreciate any comments, ideas, suggestions or any feedback. Thanks.
top | back to tutorials overviewAdvanced animation
Warning:The following parts are advanced topics and loosely coupled. I also want to warn you of some of the concepts which might not be as useful as they look at first look. Often these "optimizations" have some constraints which makes them useless for certain applications. Some of them are here for completeness, some might be useful somehow. You have been warned!Frame changing of 2**n frames
In How to change a frame it has been shown how to change the frames. You ever wondered why many engines only can only handle animations with 2**n frames? Here is your answer: it is a special case which is efficient but has one restriction: the animation must have 2**n frames.self.current += 1 self.current = self.current & (len(self.frames)-1)This should be faster, since it is an bitwise operation, than using modulo or an if(). The trick is as follow: Say we have an animation of length 8 (= 2**3). Written as binary number this is: 1000b. Now we look at the other number we need, len(self.frames)-1 which would be 7, written as binary: 0111b. I have written down the entire sequence so you can see what really happens:
current binary &     7   =   current

0       0000b  &  0111b  =  0000b    0
1       0001b  &  0111b  =  0001b    1
2       0010b  &  0111b  =  0010b    2
3       0011b  &  0111b  =  0011b    3
4       0100b  &  0111b  =  0100b    4
5       0101b  &  0111b  =  0101b    5
6       0110b  &  0111b  =  0110b    6
7       0111b  &  0111b  =  0111b    7
8       1000b  &  0111b  =  0000b    0  <- this is what we are after
Also this technique is suitable for frame skipping but as said, only applicable for animations with 2**n number of frames.
As for any tutorial here, I would appreciate any comments, ideas, suggestions or any feedback. Thanks.
top | back to tutorials overviewFrame based timing
Instead of using a constant frame rate for the entire animation the idea exist to assign every frame of the animation a duration. So each frame can have its own display time. You might think " what is it good for"? I asked this question myself until someone gave me an explanation and I will show you the usefulness in two examples:- Assume you have a game and a main character. In some games your character does some sort of animations if you just stand around doing nothing (for example tapping with the foot). This could be done with frame based timing. Just set the timing in the first frame to a couple of seconds.
- Second example: in a volcanic landscape you could have bubbling slopes. Perhaps you want to make these bubbles to bubble from time to time. You could set a random time for the first frame of the animation each time the animation is started (or gets to the first frame, see below in "more flexibility" on how to do that). Then the bubbles would bubble from time to time with a random pause duration.
import pygame
import pygame.sprite.Sprite as Sprite

class FrameTimedAnimation(Sprite):

    def __init__(self):
        Sprite.__init__(self)
        self.frames = []     # stores tuples (duration in ms, image-surf)
        self.current = 0     # index, which frame to show
        self._next_update = 0# next time to update
        self.image = None
        self.rect = None
        self.playing = True

    def update(self, dt, t):
        if self.playing:
            if self._next_update <= t:
                while self._next_update <= t: # for frame skipping, at least once
                    self.current += 1
                    self.current %= len(self.frames)
                    duration, next_image = self.frames[self.current]

                    # summing the durations and calculating the new time when to change
                    self._next_update += duration

                self.image = next_image
                # only needed if size of frames can change
                self.rect = self.image.get_rect(center=self.rect.center)
As you can see, instead of summing the period it has to be the duration of the single frames. This
is done in a while loop because its the same code for frame skipping.
As for any tutorial here, I would appreciate any comments, ideas, suggestions or any feedback. Thanks.
top | back to tutorials overviewUsing a anchor point
A anchor point is a point which will exactly be over the coordinates you blit the image to. So if the anchor point is not at the topleft (as it is in pygame an many other graphic toolkit), then the image will somehow be "displaced" relative to this anchor point. I think an picture might make more sense to you than my words: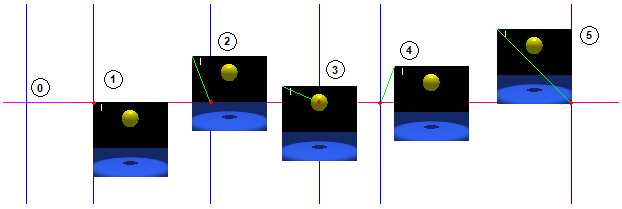
If you want to blit a image to another you tell where to blit the image. Normally in pygame the image is blit with its topleft corner at the coordinates you defined (see case 1). But now a anchor point is used which displaces the image accordingly. In case 2 and the other cases there is a anchor point defined as (x,y) distance from the topleft corner. You even can place the anchor point outside the image like in case 4. So in case 2 it would be something like (x,y) == (10, 20). The anchor point is the coordinate using the topleft corner as (0,0). Look at it as an "offset" of the image with reversed signs. This additional information can be stored either once for the animation, then it is more like an offset, or for each frame (which makes more sense). Like in the frame based timing this information can be saved into a tuple like (anchp_x, anchp_y, frame). Lets look at the code of a simple frame based animation using the anchor point-technique:
import pygame
from pygame.sprite import Sprite as Sprite

class AnchoredAnimation(Sprite):

    def __init__(self, frames, pos, fps=20):
        Sprite.__init__(self)
        self.frames = frames       # [(anchp_x, anchp_y, image),...]
        self.current = 0       # idx of current image of the animation
        self.posx = pos[0]          # instead of setting the position to the
        self.posy = pos[1]          # rect argument set these values, update handles it
        anchx, anchy, self.image = frames[0]  # just to prevent some errors
        self.rect = self.image.get_rect(topleft = (pos[0]-anchx,pos[1]-anchy))    # same here
        self.playing = 0

    def update(self, *args):
        if self.playing:    # only update the animation if it is playing
            self.current += 1
            if self.current == len(self.frames):
                self.current = 0
            anchp_x, anchp_y, self.image = self.frames[self.current]
            # moving image to match anchor point, - because it is an anchor point
            self.rect.topleft = (self.posx - anchp_x, self.posy - anchp_y)
If you use an offset (how much the image has moved fom the anchor point), then line 27 looks like this:
self.rect.topleft = (self.posx + anchp_x, self.posy + anchp_y)The only thing left to discuss concerning anchor point is how to use them. Imagine you an animation of a item rotation around the position point. Assume the item itself is not animated. There are two ways of doing it: Either you make the animation in a way that all images are big enough so the entire diameter is on the images. Then on each image the item rotates a bit further. Now you have an animation of a rotating item. The other way is using the anchor point. You can use one single image (since the item itself is not animated) which is only that big enough to hold the item itself. Then, using different anchor point, let it rotate. Here is an image to explain it:
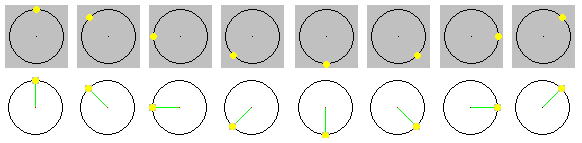
explanation: green and red dot: anchor point with green line of displacement
grey: size of image
The black circle is not part of the image. As you can see in the first case big images are used. In the second one the images are much smaller, even if the item would have been animated. So if I like to save memory then I would go for solution 2. You always will have to ask yourself: Do you want to do something in a animation or do you want to simulate it (like using a anchor point).
As for any tutorial here, I would appreciate any comments, ideas, suggestions or any feedback. Thanks.
top | back to tutorials overviewEfficient updating
After some profiling I must say that the following classes add more overhead as they help! Because of this I consider this section as a "good idea which does not behave as expected"! So it is better if you do not read it unless you really want to know about a useless idea. Explanation: The time you need to update all animations is so long that, actually, in the next call to update the time has come again to update the animations. So the 'if' never gets a chance. Here it is anyway and I would be glad if you can proof me wrong:Until now I have been talking about single animations and their update methods. An use of a pygame.sprite.Group or a simple list was assumed to be used for updating the animations. Here I want to talk on how to update many animations efficiently. I will discuss two cases: One is when all animations have the same update frequency (same fps) and the other when the fps are different.
The first case, if the animations all have the same update frequency, is not so difficult. Instead of going through the list of animations each frame and calling the update method it would make much more sense if the group would check if they need to be updated and then go through the list. Its like moving the checking code from the animations into this "AnimationManager" class. So the animations itself does not have to check anything and a simple frame based animation could be used. If the AnimationManager is time based then the animations are also time based even if they are simple frame based animations.
import pygame
import pygame.sprite.Sprite as Sprite
import pygame.sprite.RenderUpdates as Group
import pygame.sprite.Sprite as Sprite

class TimingAnimationManager(pygame.sprite.RenderUpdates):

    def __init__(self, fps=20):
        pygame.sprite.RenderUpdates.__init__(self)
        self._next_update = 0
        self._period = 1000./fps

    def update(self, dt, t):
        if self._next_update <= t:
            delta = t - self._next_update
            skipped_frames = int(delta/self._period)
            self._next_update = self._next_update + self._period + skipped_frames * self._period

            for spr in self.sprites():
                spr.update(dt, t)

            for frame in range(skipped_frames):
                for spr in self.sprites():
                    spr.update(dt, t)

# here the animation used with the AnimationManager
class SimpleAnimation(Sprite):

    def __init__(self, frames, topleft_pos):
        Sprite.__init__(self)
        self.frames = frames       # save the images in here
        self.current = 0       # idx of current image of the animation
        self.image = frames[0]  # just to prevent some errors
        self.rect = self.image.get_rect()    # same here
        self.rect.topleft = topleft_pos
        self.playing = 0

    def update(self, *args):
        if self.playing:    # only update the animation if it is playing
            self.current += 1
            if self.current == len(self.frames):
                self.current = 0
            self.image = self.frames[self.current]
            # only needed if size changes within the animation
            self.rect = self.image.get_rect(center=self.rect.center)
Naturally this method conflicts with frame based timing where every frame has its own duration.
As said, in this approach all animations have the same fps. Clearly you could instantiate
the AnimationsManager using different animation speeds, so one for animations of 10fps, one for
20fps and so on, but would not it be easier to combine them into one AnimationManager?
Lets talk about this idea in the second part.
The second approach should allow for different time based animations to be updated more efficiently. Since it can not be done in the same way as in the first approach it will be more complicated. The first idea I had was to implement a priority queue using the next_update_time for sorting. Then at each call to update just check if the time for the first element has arrived. If so, update the animation. But I think the overhead of removing and inserting is too big (I did not try it).
The next approach has two small restrictions, but should perform better. The restrictions are that all animations must have a common divisor (base-rate) of their period time and you must know the longest update period. Say, for simplicity, 5ms is the common divisor. Then you can animate animations with 5ms, 10ms, 15ms, 20ms and so on. To do it fast an list with 4 entries will be kept. Each entry is also a list. The entire thing looks like this: [[5ms], [10ms], [15ms], [20ms]]. The important point is that the list has entries for all multiples until the longest period has been reached. Now, on each update, you check which entry has been activated and update all animations in that list. Lets look on how the code looks like:
## UNTESTED CODE!!
import pygame

class RateBasedAnimationsManager(object):
    def __init__(self, min_rate, max_rate, base_rate):
        self._animations = []
        for rate in range(min_rate, max_rate+1, base_rate:
            self._animations.append([])
        self._min_rate = min_rate      # in ms
        self._max_rate = max_rate      # in ms
        self._base_rate = base_rate    # in ms
        self._next_update = 0
        self._current = 0


    def update(self, dt, t):
        if t > self._next_update:
            self._next_update += self._base_rate
            self._current += 1
            self._current %= len(self._animations)

            for anim in self._animations[self._current]:
                anim.update(dt, t)

    def add(self, animation, rate):
        # check if the rate is too big, perhaps print a warning
        if rate > self._max_rate:
            rate = self_max_rate
        # check if it is to small, perhaps print a warning
        if rate < self._min_rate:
            rate = self._min_rate
#        # round the rate to the next near multiple of the base rate
#        rest_rate = rate % self._base_rate
#        if rest_rate != 0:
#            if rest_rate >= (self._base_rate/2):
#                rate += (self._base_rate-rest_rate)
#            else:
#                rate -= rest_rate
        # add the animation
        for rates in range(rate, self._max_rate+1, rate):
            self._animations[rates/self._base_rate-1].append(animation)

    def remove(self, animation):
        # make it as as simple as possible
        # not the fastest way ;-)
        for slot in self._animations:
            if animation is in slot:
                slot.remove(animation)
As you can see, it gets quite complicated.
As for any tutorial here, I would appreciate any comments, ideas, suggestions or any feedback. Thanks.
top | back to tutorials overviewImage strips/matrix
Instead of using single images you could put all images needed for an animation into a big image. Something like this: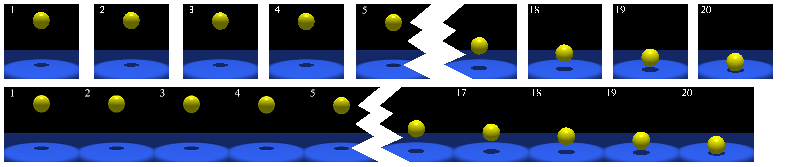
The upper part represents single images, the lower part one big image with all the single images packed next to each other. It has some advantages if you use strips or even matrices.
- with one single load you have loaded the entire animation sequence
- scaling of an animation is much easier (or even all animations of an object, when using a matrix
- you need more code for the animation
- when blitting the animation you need a source rect (it will change your drawing code)
- you need to know or store the size of the single frames somewhere (or number of frames used)
- if using a image matrix, all animations will have same number of frames (that is not really an disadvantage, is it?)
import pygame
import pygame.sprite.Sprite as Sprite

class StripAnimation(Sprite):

    def __init__(self, strip, size, pos):
        Sprite.__init__(self)
        self.image = strip # save the image strip here
        self._frame_w = size[0]       # width of single frame
        self._frame_h = size[1]       # height of single frame
        self.source_rect = pygame.Rect((0,0), size) # source rect
        # topleft is the position where it gets blit
        self.rect = pygame.Rect(pos, size)
        self.playing = 0

    def update(self, *args):
        if self.playing:    # only update the animation if it is playing
            self.source_rect.x += self._frame_w    # move the rect to the next frame
            self.source_rect.x %= self.image.get_width()
As you can see, the source_rect is actually moved by the frame width. When you have to draw this
animation you will have to do something like this:
dirty_rect = screen.blit(anim.image, anim.rect, anim.source_rect)This will blit the current frame to the position of rect. The extension to image matrix is simple: just put another animation strip beneath it and move the source_rect also in y direction, depending on which animation should play.
As for any tutorial here, I would appreciate any comments, ideas, suggestions or any feedback. Thanks.
top | back to tutorials overviewMore Flexibility
To give the developer much more design flexibility is always good. The idea here is to add a callback function which is called each time the animation reaches its end. The idea is that the developer plugs in its own custom function which can be either complex or simple. I will show you how to do it with a simple frame base animation:
import pygame
import pygame.sprite.Sprite as Sprite

class FlexibleAnimation(Sprite):

    def __init__(self, frames, pos, callback=None):
        Sprite.__init__(self)
        self.frames = frames       # save the images in here
        self.current = 0       # idx of current image of the animation
        self.image = frames[0]  # just to prevent some errors
        self.rect = self.image.get_rect(topleft=pos)    # same here
        self.playing = 0
        self._callback = callback # pass in self, for external functions

    def update(self, *args):
        if self.playing:    # only update the animation if it is playing
            if self.current == len(self.frames)-1:  # end of animation
                self.playing = 0                  # stop animation
                if self._callback:
                    self._callback(self)              # call the callback
            else:
                self.current += 1
            self.image = self.frames[self.current]
            # only needed if size changes within the animation
            self.rect = self.image.get_rect(center=self.rect.center)
You might ask yourself what the advantage should be. Frankly, this looping example is too simple so
I will give you some other examples. Assume you want to start another animation when this one
finishes. This way you could chain animations.
Or you could remove this animation from the drawing group (assuming the use of
pygame.sprite.RenderUpdates or similar). Doing more complicated things like querying the state of
an object and then doing something to the animation is also possible.
As for any tutorial here, I would appreciate any comments, ideas, suggestions or any feedback. Thanks.
top | back to tutorials overviewMoving an animation around
An animation is normally designed to move at a certain speed and at a certain frame rate (fps). This means if your animation is running at a certain fps then it should move with a certain speed. But what if the speed is decreased? Then your animation should run at a lower fps. Why? Imagine a wheel rolling over the ground. If it rolls slow (means lower fps) then the speed is slow too. It is not always easy to find the correct values for an animation, but I think normally there is a linear correlation between fps and moving speed.Another way to achieve movement is to move it some pixels each frame. This might be easier to implement.
As for any tutorial here, I would appreciate any comments, ideas, suggestions or any feedback. Thanks.
top | back to tutorials overviewAdditional information storage
What additional information might be stored?- size of single images
- size of a single image of an image strip
- anchor points or offsets
- fps if fps is not equal to (number of images)/second
- movement (pixels) per frame
For 1. and 2. there are some nice tricks. If you have an image strip, then you need to know the size of the single images. You could write the size into the file name like this (if all images have same size):
name_w_h.png

Example: car_100_50.png
or another way would be to say how many images there are:
name_n_m.png

Example: hero_20_5.png
It means that each animation has 20 pictures and there are 5 different actions or animations. Of course you will have to parse the file names to get the information back, but that should not bet much trouble (use split('.') and then split('_') to split the string).
If you want to save the anchor points, then the simplest thing is to write it into a file. If you are using single images instead of an image strip then you could save the information as well into the filename(s). Once I thought to save some information into some special pixels, but I think it would cause more trouble than it is worth it (it would also be more difficult to set the values).
