Blit tutorial
- First blit
- Using background
- Transparency
- Movement
- Blitting only a part of the source image
- Optimizations
First blit
The idea is to put an image on screen. I suggest that you look first at the documentation of the blit() function in the surface module . The blit function copy the pixel from one surface to another.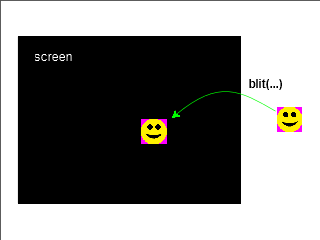
Before we can do that, we need to load the image. You will find the load() -function in the image module of pygame.
image = pygame.image.load("01_image.png")
(if you have your image in a subdirectory then you should use
os.path.join() to join your path
together because if you do otherwise it could cause problems on different platforms)
Now we have loaded the image and can blit it to the screen.
screen.blit(image, (50,50))What it does is copy the pixels of the image surface to the screen surface. The position (50,50) is the top left corner of the image. If you try that now you will get a black screen. It is because we have forgot to update the screen. The full screen update is done using pygame.display.flip().
pygame.display.flip()
 After that it is visible on screen. We have written to the screen surface in the memory before and
now we have updated it on the display.
After that it is visible on screen. We have written to the screen surface in the memory before and
now we have updated it on the display.
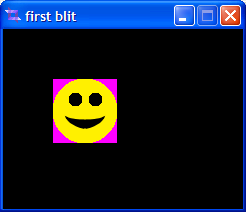
So far we have updated the screen only once, after we have "blit-ed" the image to the screen surface. Try it first by yourself before you take a look at the source "first blit".
As for any tutorial here, I would appreciate any comments, ideas, suggestions or any feedback. Thanks.
top | back to tutorials overviewUsing background
The idea is to use a background to blit the image on top. The background can be either another image or just a filled surface. Filling the surface is the easier background but not the nicest one. In code it is just the fill(color, rect=None) function:screen.fill((r,g,b))After that you blit your image over it as shown in the first section.
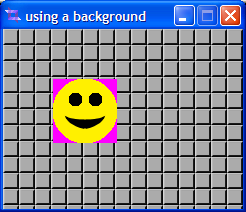
Using a background image is similar, but instead of filling it you blit the background image first on the screen:
screen.blit(bgd_image, (0,0))We blit it at the top left corner of the screen that is (0,0). The background image bgd_image should have the same size as the screen (or bigger but the clipped parts will not be seen).
Note the order we have had to blit the images, first the background, then the image. Try it first by yourself, then take a look at the source "using background"
As for any tutorial here, I would appreciate any comments, ideas, suggestions or any feedback. Thanks.
top | back to tutorials overviewTransparency
There are 3 ways to make something transparent in pygame.- Colorkey is the simplest one. All pixels with the same color as defined as colorkey will not be drawn. That means they are 100% transparent.
- Per pixel alpha: if you create an image using a tool such as a painting program or a renderer, the resulting image may have some pixels that are half transparent. That would be a images that has per pixel alpha, an alpha channel for each pixel.
- Per image alpha: its the alpha channel for the entire image. All pixels will be drawn using the same alpha value.
Colorkey
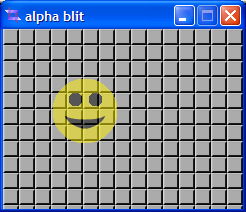
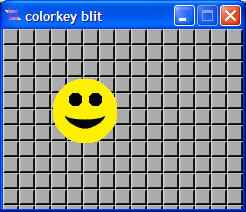 Well, as you can see in the images above, around the "smiley" there is a ugly pink border.
Usually you do not want to have only square sized images in your game. There is a technique called
colorkey that makes one color fully transparent. The function is quite simple, its called
set_colorkey(color):
Well, as you can see in the images above, around the "smiley" there is a ugly pink border.
Usually you do not want to have only square sized images in your game. There is a technique called
colorkey that makes one color fully transparent. The function is quite simple, its called
set_colorkey(color):
image.set_colorkey((255,0,255))You get the source , but try it first by your own.
WARNING: if an image has an alpha value set, then the color_key will not work! A simple trick to make colorkey work is: image.set_alpha(None) to disable it and then you can use set_colorkey(...) on it.
As for any tutorial here, I would appreciate any comments, ideas, suggestions or any feedback. Thanks.
top | back to tutorials overviewAlpha
 Using the alpha value you can make an image transparent. This can be used to make some cool effects.
The code to use is simple as using a colorkey. Its
set_alpha(value):
Using the alpha value you can make an image transparent. This can be used to make some cool effects.
The code to use is simple as using a colorkey. Its
set_alpha(value):
image.set_alpha(128)This will make the image half transparent using the per surface alpha (not per pixel alpha). Here I use a colorkey too to make the pink border transparent. Well to avoid some problems using alpha and colorkey I have looked it up in the sdl documentation what combinations will work. Its because not any combination is possible and you might then wonder why it does not do what you want. In the documentation is said:
The per-surface alpha value of 128 is considered a special case and is optimized, so it's much faster than other per-surface values.
- RGB: surface without per pixel alpha
- RGBA: surface with per pixel alpha
- SDL_SRCALPHA: surface with per surface alpha
- SDL_COLORKEY: surface using a colorkey
| RGBA->RGB with SDL_SRCALPHA | The source is alpha-blended with the destination, using the alpha channel. SDL_SRCCOLORKEY and the per-surface alpha are ignored. |
| RGBA->RGB without SDL_SRCALPHA | The RGB data is copied from the source. The source alpha channel and the per-surface alpha value are ignored. If SDL_SRCCOLORKEY is set, only the pixels not matching the colorkey value are copied. |
| RGB->RGBA with SDL_SRCALPHA | The source is alpha-blended with the destination using the per-surface alpha value. If SDL_SRCCOLORKEY is set, only the pixels not matching the colorkey value are copied. The alpha channel of the copied pixels is set to opaque. |
| RGB->RGBA without SDL_SRCALPHA | The RGB data is copied from the source and the alpha value of the copied pixels is set to opaque. If SDL_SRCCOLORKEY is set, only the pixels not matching the colorkey value are copied. |
| RGBA->RGBA with SDL_SRCALPHA | The source is alpha-blended with the destination using the source alpha channel. The alpha channel in the destination surface is left untouched. SDL_SRCCOLORKEY is ignored. |
| RGBA->RGBA without SDL_SRCALPHA | The RGBA data is copied to the destination surface. If SDL_SRCCOLORKEY is set, only the pixels not matching the colorkey value are copied. |
| RGB->RGB with SDL_SRCALPHA | The source is alpha-blended with the destination using the per-surface alpha value. If SDL_SRCCOLORKEY is set, only the pixels not matching the colorkey value are copied. |
| RGB->RGB without SDL_SRCALPHA | The RGB data is copied from the source. If SDL_SRCCOLORKEY is set, only the pixels not matching the colorkey value are copied. |
You may try it first by your self and then take a look at the source.
As for any tutorial here, I would appreciate any comments, ideas, suggestions or any feedback. Thanks.
top | back to tutorials overviewMovement
In this section I will tell mainly about how to draw a moving object on screen. I am not going to tell you, how to move the object in a particular way, that is an other story. I will use a very simple way to move it. So let us start with a simple example. First of all we need some variables holding the position and the step size of our "smiley". We define them before the main loop:
    # define the position of the smiley
    xpos = 50
    ypos = 50
    # how many pixels we move our smiley each frame
    step_x = 10
    step_y = 10
What we have to do next is to change the position by the step size each time it loops through the
main loop. So we write in the main loop something like this:
        # check if the smiley is still on screen, if not change direction
        if xpos>screen_width-64 or xpos<0:
            step_x = -step_x
        if ypos>screen_height-64 or ypos<0:
            step_y = -step_y
        # update the position of the smiley
        xpos += step_x # move it to the right
        ypos += step_y # move it down
The two if-statements are there to keep the smiley in the screen. Perhaps you wonder why there is an
-64 in xpos>screen_width-64. Well, remember the blit position is always the top left corner of the image and what we have
actually saved is the position of the top left corner into xpos/ypos. If we would just check xpos>screen_width
then the smiley would slide completely out of the screen before it will change direction and come back.
If you have coded that and try to run it (try it!)
you will see nothing happened on screen! Why? Well, we forgot to blit the smiley at the new position!
So let's do it, add the following lines in the main loop, after the position update:
        # now blit the smiley on screen
        screen.blit(image, (xpos, ypos))
        # and update the screen (don't forget that!)
        pygame.display.flip()
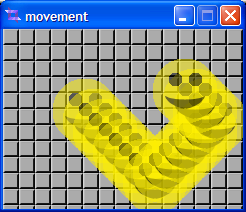
But what is that? What have we done wrong? Well I think we forgot to erase the current screen. Because
now there is an image of the smiley at each position it once was. So let us fix that. Before blitting
the smiley we have to erase the screen. How to do it? Just blit the background over anything
on the screen.
        # first erase the screen
        #(just blit the background over anything on screen)
        screen.blit(bgd_image, (0,0))
        # now blit the smiley on screen
        screen.blit(image, (xpos, ypos))
        # and update the screen (don't forget that!)
        pygame.display.flip()
So what have we learned? For a moving or somehow changing image, the basic algorithm is as follows:
For each frame in the main loop do:
- update objects (like move them, change them, what ever)
- erase objects using background
- draw objects to the screen
- update the screen using flip() or update() function (do not forget about that or you will not see anything!)
Right, here you can download the source for that section.
As for any tutorial here, I would appreciate any comments, ideas, suggestions or any feedback. Thanks.
top | back to tutorials overviewBlitting only a part of the source image
...building...As for any tutorial here, I would appreciate any comments, ideas, suggestions or any feedback. Thanks.
top | back to tutorials overviewOptimizations
Before we start with optimizations I have to say:First do it right, then optimize!or in other words:
First you must understand the problem exactly before you can optimize the code.
 First of all I have to introduce you to
pygame.Rect.
It is a very useful object you need to understand. So take a good look at it.
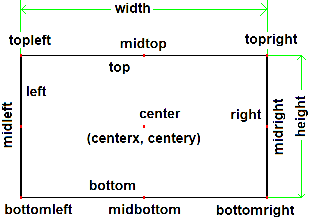
It has a lot of different attributes as shown on the right. Let's say you want to put the topleft
corner
of the rectangle to (100,100) you can just write(assuming r is an instance of pygame.Rect):
r.topleft = (100, 100) (all other values like
center, topright, etc. will be set to correct values too).
First of all I have to introduce you to
pygame.Rect.
It is a very useful object you need to understand. So take a good look at it.
It has a lot of different attributes as shown on the right. Let's say you want to put the topleft
corner
of the rectangle to (100,100) you can just write(assuming r is an instance of pygame.Rect):
r.topleft = (100, 100) (all other values like
center, topright, etc. will be set to correct values too).
Now then, after we have learned how to use the rect object, we will move on to discuss the dirty rects technique.
Dirty rects
 Perhaps you have been asking yourself: Why updating the entire screen if only a few pixels actually changed?
You are right, it is faster (in most cases) to only update the changed areas. These
areas are called "dirty rects" because they need a redraw and they are normally of a rectangular shape. Now the
question arises how to find these dirty rects. Fortunately, the
blit(...)
function returns a
pygame.Rect
. The only thing we have to do is to store that rect into a list. Then instead of using
flip()
you want to use
update()
because update takes a list of rectangles as argument. You guessed right, it will update on screen
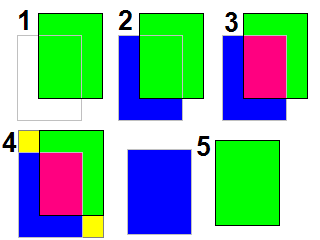
areas described by the rectangles. But, wait, if you have a sprite moving around, does this
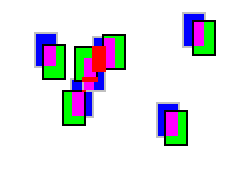
update the screen correctly? No it does not. As you can see on the picture at the right the area
where it was has to be updated too (blue area). I call it old_rect.
Since most sprites move not far in one frame,
most of the time you will have an intersection (pink area) as shown in 3. So if you would update
the two areas independently it would work fine, but the pink area in 3 would be updated twice and
that is not good performance. The simplest thing to do is to union the two rects as shown in 4. The yellow
areas were not dirty, but now they will be updated too. So instead of two rects (blue and green) we
now have one big one containing both. This is how
pygame.sprites.RenderUpdates
works. Case 5 is not interesting because you will have to update both rects anyway.
Perhaps you have been asking yourself: Why updating the entire screen if only a few pixels actually changed?
You are right, it is faster (in most cases) to only update the changed areas. These
areas are called "dirty rects" because they need a redraw and they are normally of a rectangular shape. Now the
question arises how to find these dirty rects. Fortunately, the
blit(...)
function returns a
pygame.Rect
. The only thing we have to do is to store that rect into a list. Then instead of using
flip()
you want to use
update()
because update takes a list of rectangles as argument. You guessed right, it will update on screen
areas described by the rectangles. But, wait, if you have a sprite moving around, does this
update the screen correctly? No it does not. As you can see on the picture at the right the area
where it was has to be updated too (blue area). I call it old_rect.
Since most sprites move not far in one frame,
most of the time you will have an intersection (pink area) as shown in 3. So if you would update
the two areas independently it would work fine, but the pink area in 3 would be updated twice and
that is not good performance. The simplest thing to do is to union the two rects as shown in 4. The yellow
areas were not dirty, but now they will be updated too. So instead of two rects (blue and green) we
now have one big one containing both. This is how
pygame.sprites.RenderUpdates
works. Case 5 is not interesting because you will have to update both rects anyway.
# draw method from pygame.sprites.RenderUpdates
def draw(self, surface):
   spritedict = self.spritedict               # {sprite:old_rect}
   surface_blit = surface.blit                # speed up
   dirty = self.lostsprites                   # dirty rects (from removed sprites)
   self.lostsprites = []
   dirty_append = dirty.append                # speed up
   for s in self.sprites():
       r = spritedict[s]                      # get the old_rect
       newrect = surface_blit(s.image, s.rect)# draw it
       if r is 0:                             # first time the old_rect is 0
           dirty_append(newrect)              # add the rect from the blit, nothing else to do
       else:
           if newrect.colliderect(r):         # if the old_rect and the newrect overlap, case 3
               dirty_append(newrect.union(r)) # append the union of these two rects
           else:
               dirty_append(newrect)          # not overlapping so append both, newrect and
               dirty_append(r)                # old_rect to the dirty list, case 5
       spritedict[s] = newrect                # replace the old one with the new one
   return dirty                               # return the dirty rects list
Is it the best we can do? I think not. If you have many moving sprites which overlap
in their movement, this approach will still update many areas twice. And it has one more major disadvantage:
it has to clear and redraw every sprite (otherwise is would not work, see
dirty flags
). But that leads us to the next
section: dirty areas union.
As for any tutorial here, I would appreciate any comments, ideas, suggestions or any feedback. Thanks.
top | back to tutorials overviewDirty areas union
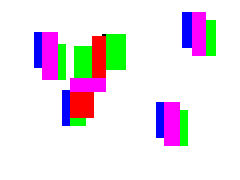
 As you can see on the pictures at the right side, there are some overlapping areas. The
green rectangles are sprites moving around, the blue ones are the old position of a green
sprite. The pink and red areas represent overlapping parts. The red indicates 3 or more overlapping
dirty rectangles and Pink represents two overlapping rectangles. The idea now is to update only
the area really needed. But how to find it?
As you can see on the pictures at the right side, there are some overlapping areas. The
green rectangles are sprites moving around, the blue ones are the old position of a green
sprite. The pink and red areas represent overlapping parts. The red indicates 3 or more overlapping
dirty rectangles and Pink represents two overlapping rectangles. The idea now is to update only
the area really needed. But how to find it?
One way is a constructive algorithm:
- take the dirty rect you want to add to the list of dirty rects
- check for any overlapping with the rects already in the list
- if there's an overlapping rect in the list, build a union of the two, and remove the one in the list
- now check the union again for overlapping with the remaining rects of the list (step 1)
_update = []                              #list that contains the (or already added) dirty rects

_union_rect = _rect(spr.rect)             # copy the rect because it will be modified
_union_rect_collidelist = _union_rect.collidelist # speed up
_union_rect_union_ip = _union_rect.union_ip       # speed up
i = _union_rect_collidelist(_update)      # check for overlapping areas
while -1 < i:                             # as long a overlapping area is found
    _union_rect_union_ip(_update[i])      # union the two rects
    del _update[i]                        # remove the one from the list
    i = _union_rect_collidelist(_update)  # check again for overlapping ares
_update.append(_union_rect.clip(_clip))   # at the end add the new found rect to the list
# do the same for the old rect (old position of the sprite)

This algorithm is good if there are some overlapping areas. The result of it can be seen on the right side. You get only 3 dirty areas on screen. The biggest one is actually a bit too big, but I have found that this is not a performance bottleneck as long the rect does not cover most of the screen (because then a full screen redraw would probably be faster).In worst case the dirty area is just the screen area. The worst case it when no rectangle overlaps with any other. In that case it is an O(n**2) algorithm. This code is actually use in the DirtyLayered group (know as FastRenderGroup too, see FastRenderGroup). There is a similar problem as using dirty rects, see: dirty flags .
As for any tutorial here, I would appreciate any comments, ideas, suggestions or any feedback. Thanks.
top | back to tutorials overviewDirty area splitting
 Actually this idea is quite new to me and I have to admit I have not tried it yet.
I have no idea how good its performance is so do not blame me if it does not work.
The idea is to find the overlapping parts and split these areas in a way so the resulting
rectangles do not overlap. As you can see in the picture I have tried to visualize that
using different colors. In this case you will get 17 rectangles. You can get a large number
of rectangles by splitting and I do no know if that could be an performance hit.
Actually this idea is quite new to me and I have to admit I have not tried it yet.
I have no idea how good its performance is so do not blame me if it does not work.
The idea is to find the overlapping parts and split these areas in a way so the resulting
rectangles do not overlap. As you can see in the picture I have tried to visualize that
using different colors. In this case you will get 17 rectangles. You can get a large number
of rectangles by splitting and I do no know if that could be an performance hit.
As for any tutorial here, I would appreciate any comments, ideas, suggestions or any feedback. Thanks.
top | back to tutorials overviewTiling
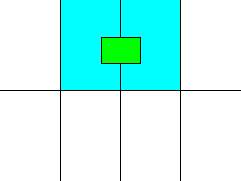 The main idea of tiling it to split the screen into a number of smaller areas.
Then when you draw a sprite, you have to check in which areas where the four corners of
the sprite and set that area(s) dirty. Next sprite you test you will not have to check that dirty area(s)
again because it is already dirty and will be updated. Until now I have tried to implement a
tiling algorithm but got always something slower than the
Dirty areas union.
On the right you can see a single sprite
(green). That causes an update of the two blue areas of the screen. As the other approaches
this one has a similar problem, see:
dirty flags
The main idea of tiling it to split the screen into a number of smaller areas.
Then when you draw a sprite, you have to check in which areas where the four corners of
the sprite and set that area(s) dirty. Next sprite you test you will not have to check that dirty area(s)
again because it is already dirty and will be updated. Until now I have tried to implement a
tiling algorithm but got always something slower than the
Dirty areas union.
On the right you can see a single sprite
(green). That causes an update of the two blue areas of the screen. As the other approaches
this one has a similar problem, see:
dirty flags
As for any tutorial here, I would appreciate any comments, ideas, suggestions or any feedback. Thanks.
top | back to tutorials overviewDirty flags
Well the dirty flag technique sounds very simple, but it has some implications. First a short explanation: You add a new attribute to your sprite, call it "dirty". Let's say it can take two values, 0 for not dirty and 1 for dirty. Then when you draw your sprites you do something like this:
for spr in sprites:
    if spr.dirty:
        # do the drawing, only for dirty sprites and reset dirty flag
So only the sprites that are marked with "dirty == 1" are drawn and the flag gets reset (important).
But wait, what if a sprite
intersects with another one? Even worse, what if that sprite is transparent, dirty and intersects
with other sprites? Yes you guessed right, these intersecting sprites need to be redrawn too!! That is
the problem I was referring in the other sections before. Any sprite in a dirty area has to be redrawn,
independent how you have found the dirty area.
It is because you erase the dirty area by filling it using a background and then you will
redraw anything in the cleaned area.
So now the algorithm changes to:
# find the dirty areas first
dirty_areas = []
for spr in sprites:
    if spr.dirty:
        # add this sprite area to the dirty areas list
        dirty_areas.append(spr.rect)

# draw the sprites
for dirty_area in dirty_areas:
    # do the drawing of the intersecting sprites
    for spr in sprites:
        if dirty_area.collide_rect(spr.rect):
            if spr.dirty:
                # just draw the sprite, because the entire sprite is in the dirty area
                # reset the flag
            else:
                # find intersecting part and draw only this part of the sprite
Well this code can be optimized using the colliding function from the pygame.Rect. I will put a snippet here
of how it is done in the FastRenderGroup (only the drawing part, for how it finds the dirty areas see
dirty areas union):
for spr in _sprites:
    if 1 > spr.dirty:                           # sprite not dirty, blit only the
        _spr_rect = spr.rect                    # intersecting part
        _spr_rect_clip = _spr_rect.clip
        for idx in _spr_rect.collidelistall(_update):  # find all intersecting dirty areas
            # clip
            clip = _spr_rect_clip(_update[idx])        # find the intersecting part
            _surf_blit(spr.image, clip, \              # and draw only that part
                       (clip[0]-_spr_rect[0], \
                            clip[1]-_spr_rect[1], \
                            clip[2], \
                            clip[3]), spr.blendmode)
    else: # dirty sprite                               # if dirty draw the entire sprite
        _old_rect[spr] = _surf_blit(spr.image, spr.rect, \
                               None, spr.blendmode)
        if spr.dirty == 1:                             # and reset the flag (well here it is
            spr.dirty = 0                              # special because only if dirty has
                                                       # value 1 it will be reset (2 not)
As you have seen, optimization is sometimes good, sometimes bad. Since I want to write my things
in pure python, that is all you can do. If you need even more speed, you always can consider to write
a C extension for python. Before you do that try psyco. If you decide to write an extension, then there
are some tools that might help (I have not tried one yet): swig, pyrex, boost.
